The desire for a curated, high-end home often comes with a hefty price tag. High-end boutiques and interior design showrooms frequently charge hundreds, if not thousands, of dollars for wall art that—at its core—is quite simple in construction. The secret to achieving that “store-bought” look without the designer markup lies in the choice of materials, a restrained color palette, and attention to detail.
By focusing on texture, scale, and professional finishing techniques, you can transform basic craft supplies into sophisticated statement pieces. Whether you are a seasoned crafter or a novice looking to refresh your space, these nine DIY wall decor ideas will elevate your interior aesthetic while keeping your budget intact.
1. Textured Plaster Art
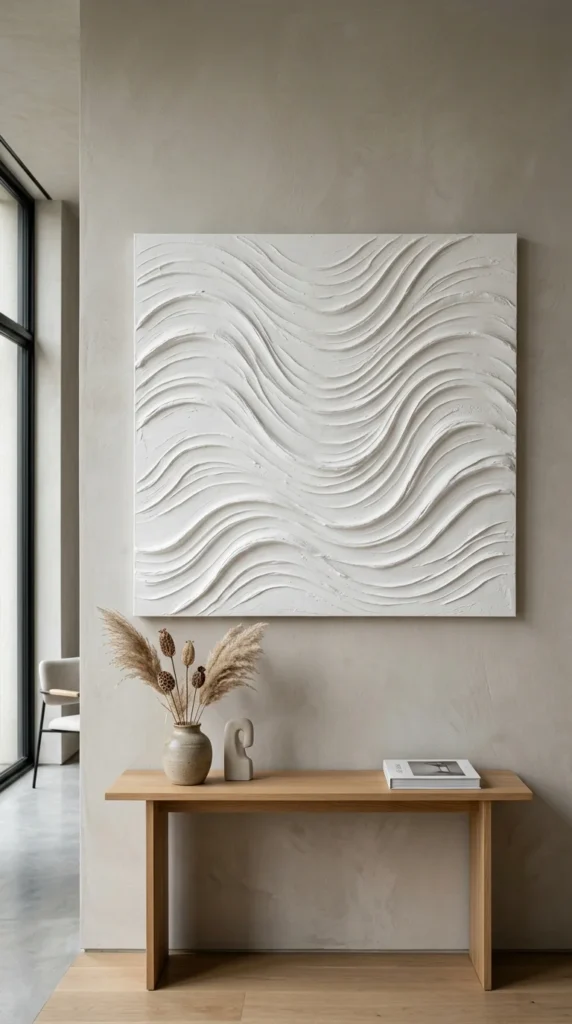
Textured “plaster” art is currently one of the most popular trends in luxury interior design. What looks like a gallery-exclusive piece is often created using a simple combination of a stretched canvas and joint compound or spackle. The beauty of this project lies in its minimalism and the way light interacts with the raised surfaces.
To achieve a professional finish, apply a thick layer of joint compound across the canvas. Use tools like a notched trowel, a wide-comb, or even a sponge to create geometric shapes, organic waves, or arched silhouettes. Once dry, you can leave it raw white for a Nordic-minimalist look or spray paint it in a matte earth tone like terracotta or sage. The key to making it look expensive is the frame; a “floater frame” made from thin strips of oak or pine will instantly give it a high-end, finished appearance.
2. Boho Yarn Hanging
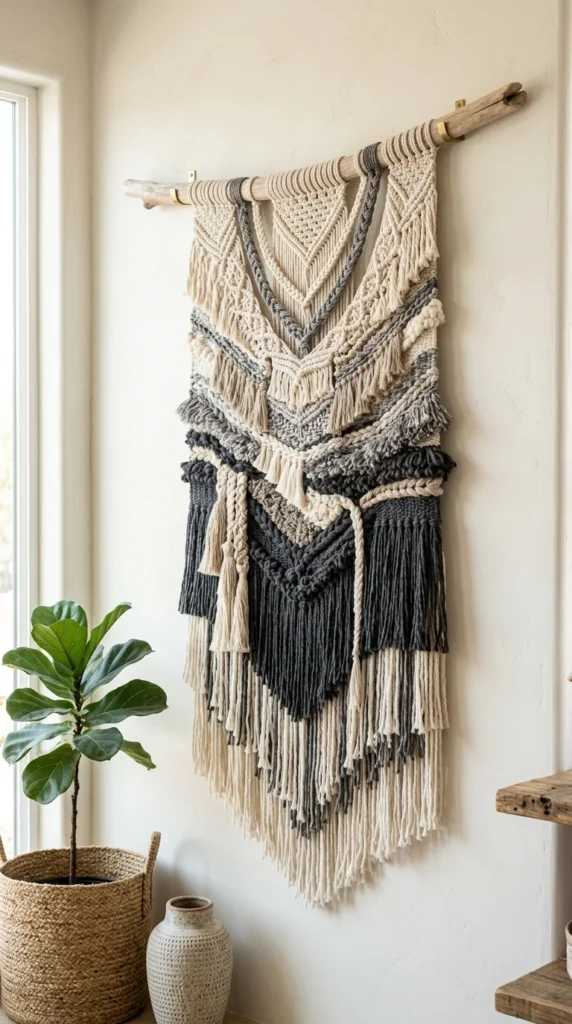
Macramé and textile art bring a much-needed softness to rooms filled with hard surfaces. A common mistake in DIY yarn art is using thin, brightly colored yarn that can look “crafty” rather than “designed.” To keep it looking store-bought, opt for high-quality cotton cord, wool roving, or thick-spun yarn in a monochromatic or muted color palette.
Start with a sturdy wooden dowel or a piece of driftwood. Use the “lark’s head knot” to attach long strands of yarn across the length of the wood. To add depth, layer different textures of yarn or incorporate a “dip-dye” effect by submerging the bottom third of the hanging into fabric dye. For a crisp, modern look, trim the bottom of the yarn into a perfect “V” shape or a sharp diagonal line using fabric shears.
3. Framed Botanical Pressings
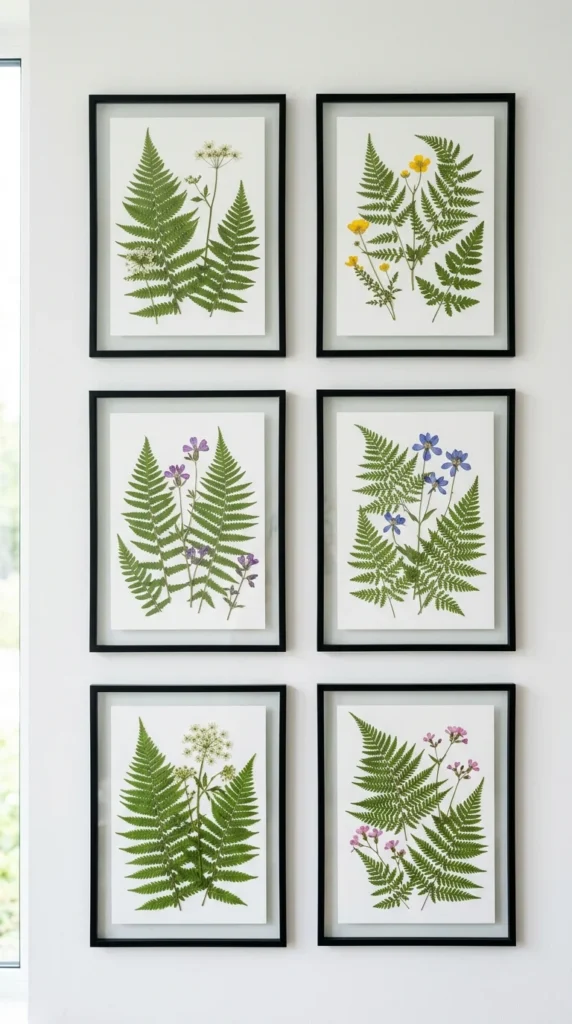
Botanical art is a timeless choice that fits into almost any decor style, from farmhouse to contemporary. Instead of buying prints, creating your own using real specimens adds an authentic, organic touch. The secret to the “boutique” look here is symmetry and framing.
Collect interesting leaves, ferns, or wildflowers and press them between heavy books for at least two weeks. Once dried and flattened, mount them onto high-quality watercolor paper using a tiny drop of clear glue. Place them in matching “gallery-style” frames with wide white mats. Hanging them in a precise grid (e.g., 2×2 or 3×2) creates a visual impact that feels intentional and expensive.
4. Geometric Wood Paneling
Architectural interest doesn’t always have to come from the building’s original structure. You can create a “feature wall” or a large-scale art piece using thin wooden lattice strips. This technique, often called “molding art,” adds dimension and shadow to a flat wall.
For a removable version, use a large sheet of plywood as your base. Cut thin wood strips and glue them in a random geometric or herringbone pattern. The trick to making this look professional is to paint the entire piece—base and strips—the same color. A matte black, deep forest green, or a soft “greige” works best. The monochromatic finish emphasizes the texture and geometry over the materials themselves.
5. Floating Gallery Shelves
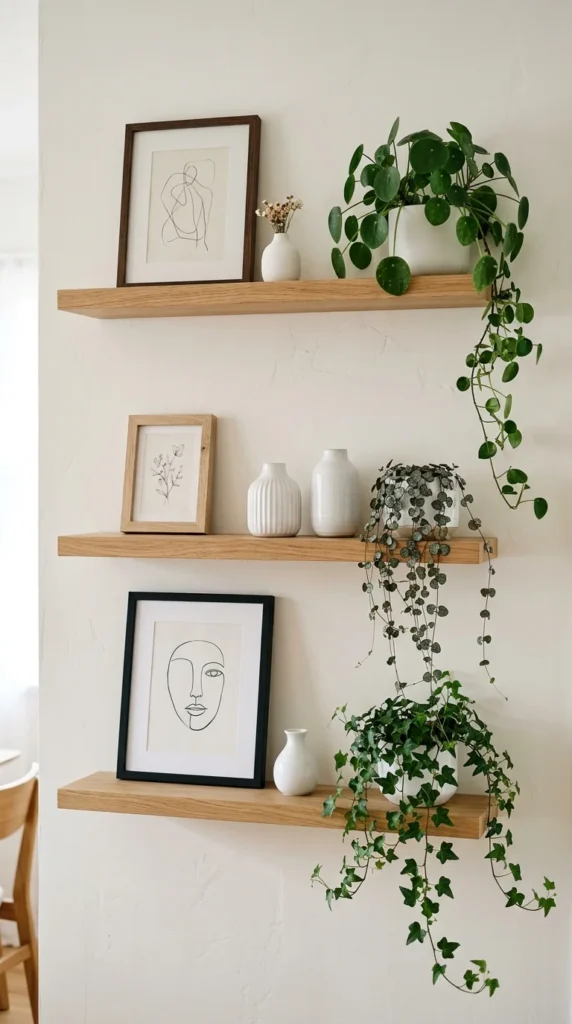
Sometimes, the “wall decor” isn’t a single object but the way objects are displayed. Floating shelves provide a platform for a rotating gallery of art and objects, giving your home a curated, lived-in feel.
To avoid the “cluttered” look, choose shelves with a slim profile and no visible brackets. When styling, follow the “rule of three” and vary the heights of your items. Overlapping a large framed print with a smaller one and adding a sculptural element (like a brass candlestick or a small bust) creates layers. Stick to a cohesive color story across all items on the shelf to ensure the arrangement looks like a single, unified piece of art.
6. Rope-Bound Mirror
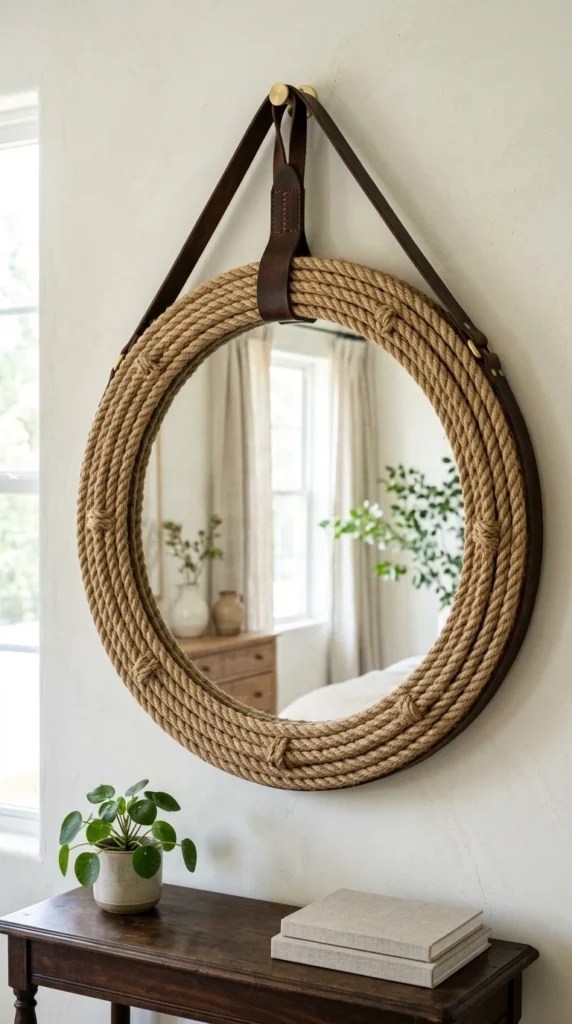
Custom mirrors are notoriously expensive, but you can upgrade a basic, frameless circular mirror with common hardware store materials. Heavy-duty manila rope or thick cotton piping can be coiled around the edge of a mirror to create a nautical or organic-modern frame.
Use a piece of plywood or heavy cardboard as a backing for the mirror, extending a few inches beyond the mirror’s glass. Carefully hot-glue the rope in concentric circles around the glass. To hide the seam where the rope starts and ends, you can wrap a piece of leather or twine around the junction. This adds a “designer” detail that distinguishes it from a standard DIY project.
7. Fabric Scarf Gallery

Silk scarves—especially vintage ones or those with bold, graphic prints—are essentially wearable art. Many high-end decorators frame designer scarves (like those from Hermès or Liberty London) to fill large wall spaces with color and pattern.
You don’t need a designer brand to make this work; any scarf with a beautiful pattern will do. The key is the mounting. Use a piece of foam core board cut to the size of your frame. Iron the scarf perfectly flat, then wrap it tightly around the foam core, pinning it at the back. Place it in a large “poster” frame with a thin metallic or black rim. This creates a large-scale, high-impact piece for a fraction of the cost of an oversized oil painting.
8. Minimalist Wire Sculpture

Wire art is the epitome of “less is more.” It mimics the look of continuous line drawings, which are highly popular in modern, minimalist interiors. Because it is three-dimensional, it casts beautiful shadows on the wall, adding a dynamic element to the room.
Use 12-gauge or 14-gauge aluminum wire, which is pliable enough to bend by hand but sturdy enough to hold its shape. You can follow a printed template of a face, a botanical stem, or an abstract shape. Spray paint the finished wire in a matte black or a brushed gold. To mount it, use tiny clear command hooks or small nails. Position the art slightly away from the wall to maximize the shadow effect, which gives the piece a “floating” gallery quality.
9. Oversized Chalkboard Calendar

Functional decor is a staple in high-end kitchens and home offices. A massive, well-framed chalkboard looks less like a classroom and more like a custom architectural feature.
Instead of using a small store-bought chalkboard, use chalkboard paint to create a large rectangle directly on your wall. Frame the painted area with decorative crown molding or simple 1×3 pine boards stained in a dark walnut. The frame is what transitions the chalkboard from “utility” to “decor.” Use a chalk marker for crisp, clean lines that won’t smudge, and incorporate hand-lettering or simple sketches to keep the look sophisticated and organized.