Transforming a blank wall into a focal point doesn’t require a massive budget or a degree in fine arts. Often, the difference between a project that looks “homemade” and one that looks “high-end boutique” lies in the materials chosen and the attention to detail during the finishing stages. Whether you are aiming for a minimalist Scandinavian vibe, a rustic farmhouse feel, or a bold modern aesthetic, these nine DIY wall decor ideas provide professional results with a personal touch.
1. Textured Canvas
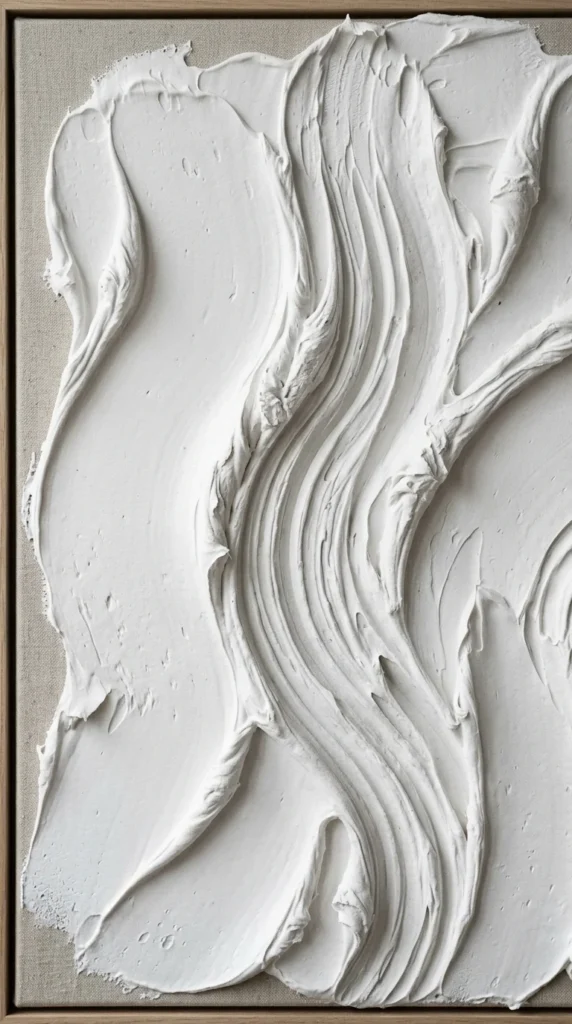
The minimalist textured art trend has taken the interior design world by storm, often retailing for hundreds of dollars in high-end galleries. You can recreate this look using a blank canvas and common hardware store materials.
- What You’ll Need: A large pre-stretched canvas, joint compound (all-purpose drywall mud), a set of palette knives or notched trowels, and optional white acrylic paint.
- The Process: Apply the joint compound generously across the canvas. Use your tools to create organic shapes—think sweeping arcs, horizontal ridges, or abstract peaks.
- Pro-Tip: Once the compound is completely dry (usually 24 hours), apply a coat of matte white paint or a specialized “sand” finish paint to give it a uniform, stone-like appearance. This hides the greyish tint of the raw compound and makes it look like a solid plaster sculpture.
2. Pressed Botanicals
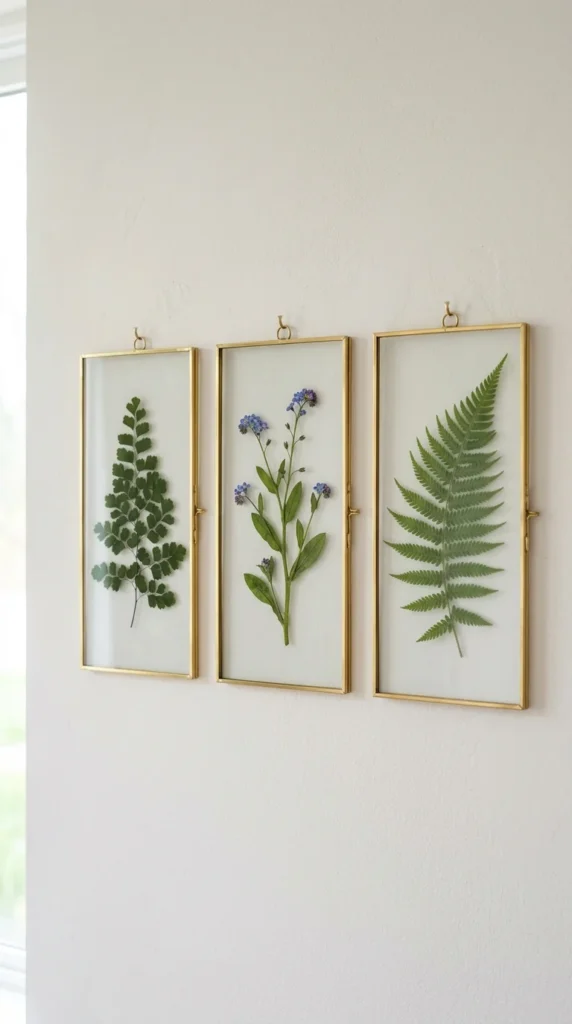
Botanical prints are timeless, but using real specimens adds a layer of authenticity and organic beauty that paper prints cannot match. This project works exceptionally well in dining rooms or hallways.
- What You’ll Need: Heavy books or a flower press, fresh greenery (ferns and eucalyptus work best), and “floating” glass frames with metal or wood borders.
- The Process: Place your greenery between sheets of parchment paper and tuck them inside a heavy book for 7 to 10 days. Ensure they are completely moisture-free to prevent mold.
- Pro-Tip: Arrange the dried plants in the center of the floating frame. Use a tiny dot of clear adhesive on the back of the stem to keep the specimen from sliding down once the frame is hung vertically.
3. Floating Shelves
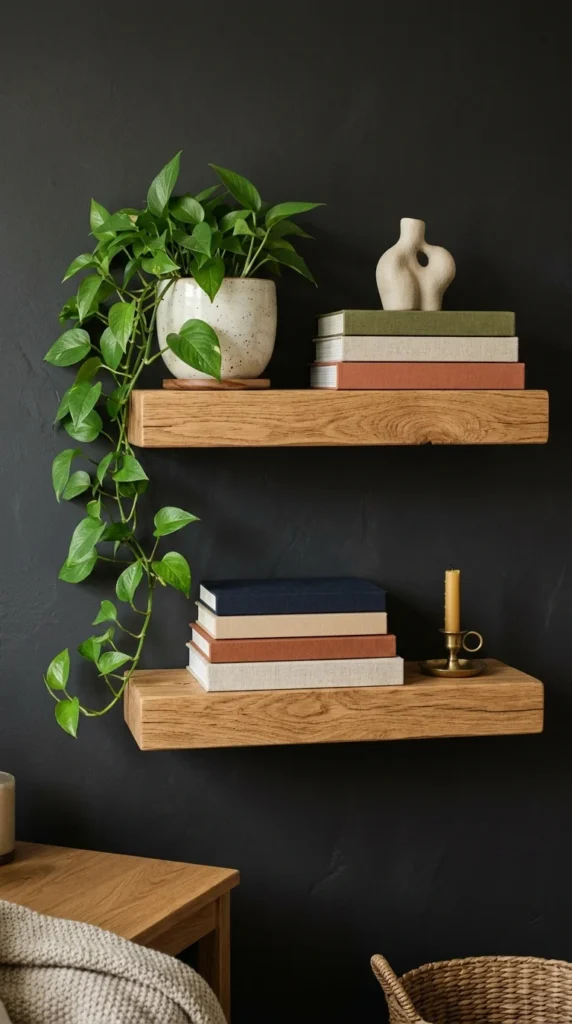
Custom shelving adds both architectural interest and a place to display smaller decor items. The key to a store-bought look is hiding the brackets and using high-quality wood.
- What You’ll Need: 2×10 or 2×12 lumber (oak or walnut for a premium look), a floating shelf bracket kit, wood stain, and a polyurethane finish.
- The Process: Cut the wood to your desired length and drill holes into the back edge to accommodate the hidden rods of the bracket kit. Sand the wood thoroughly, moving from coarse to fine-grit sandpaper.
- Pro-Tip: Use an “Early American” or “Weathered Oak” stain for a modern, neutral tone. Applying a matte topcoat instead of a glossy one will give the shelves a contemporary, designer feel rather than a DIY “crafty” look.
4. Macrame Textile
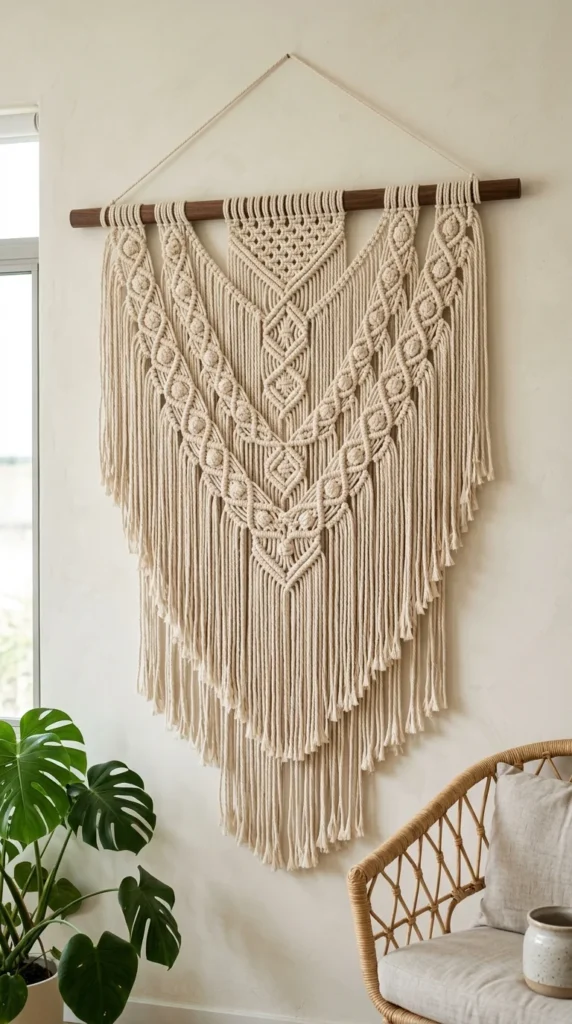
Textile art adds warmth and sound-dampening qualities to a room. While traditional macrame can be complex, a modern “statement” piece relies more on scale and texture than intricate knotting.
- What You’ll Need: A wooden dowel or a piece of natural driftwood, 4mm or 5mm cotton macrame cord, and fabric scissors.
- The Process: Use a simple “Lark’s Head” knot to attach long strands of cord to the dowel. From there, you can experiment with “Square Knots” to create a geometric pattern.
- Pro-Tip: For a high-end look, keep the color palette monochromatic. Once finished, use a fine-tooth comb to brush out the bottom fringe, creating a soft, voluminous “tassel” effect that looks professional and polished.
5. Basket Gallery
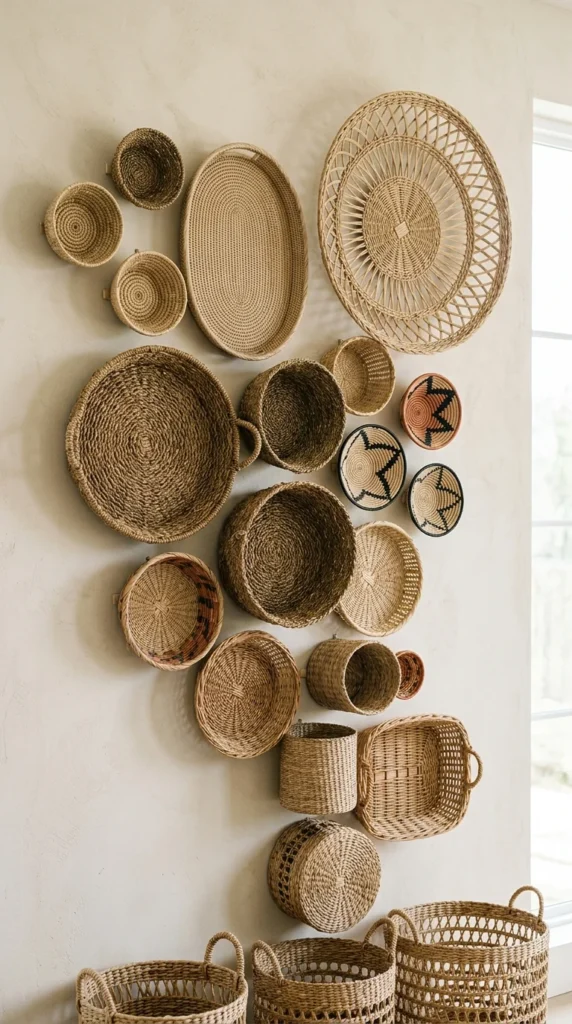
A basket wall is a fantastic way to fill a large space with texture and three-dimensional interest. It brings a global, curated feel to your home.
- What You’ll Need: A collection of 5 to 9 flat woven baskets or trays, small finishing nails, and a level.
- The Process: Lay your baskets out on the floor first to find the perfect arrangement. Start with the largest basket as the “anchor” and tuck smaller ones around it, overlapping some edges for depth.
- Pro-Tip: Look for baskets with varying depths—some flat and some slightly bowl-shaped. Mixing different weaving materials like seagrass, rattan, and banana leaf creates a sophisticated, multi-tonal look that mimics high-end interior design catalogs.
6. Geometric Wood
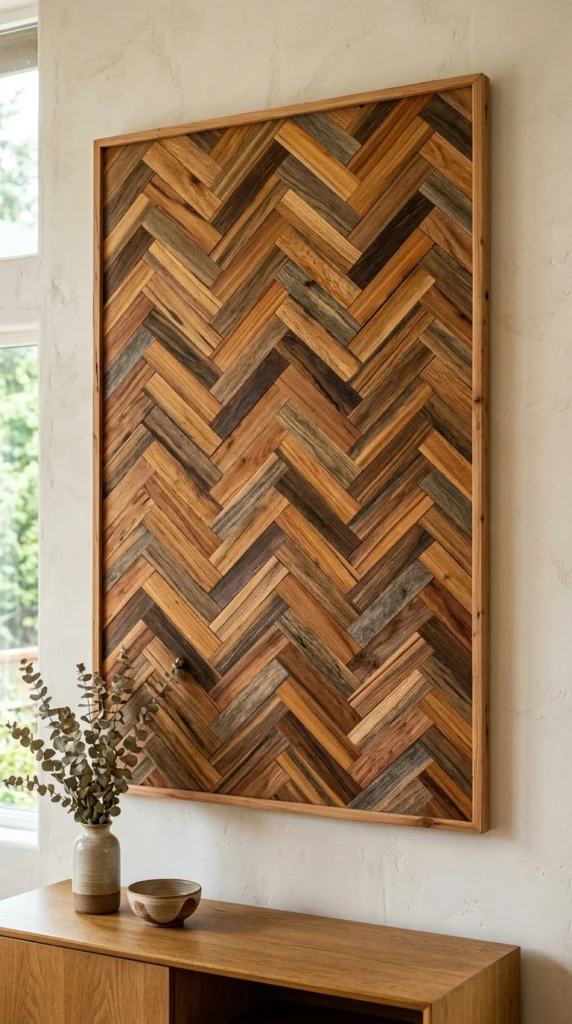
Wood lath or thin plywood strips can be transformed into intricate geometric patterns. This style of art acts as a “wood feature wall” on a smaller, more manageable scale.
- What You’ll Need: A plywood backing board, thin wood lattice strips (or balsa wood), wood glue, and a miter box or saw.
- The Process: Cut your wood strips at 45-degree angles to create chevrons, diamonds, or herringbone patterns. Glue them onto the backing board, ensuring there are no gaps between the pieces.
- Pro-Tip: Leave the wood in its natural state or use a very light white-wash to keep it looking modern. Avoid dark, heavy stains which can make the project look dated or “heavy.”
7. Engineered Prints
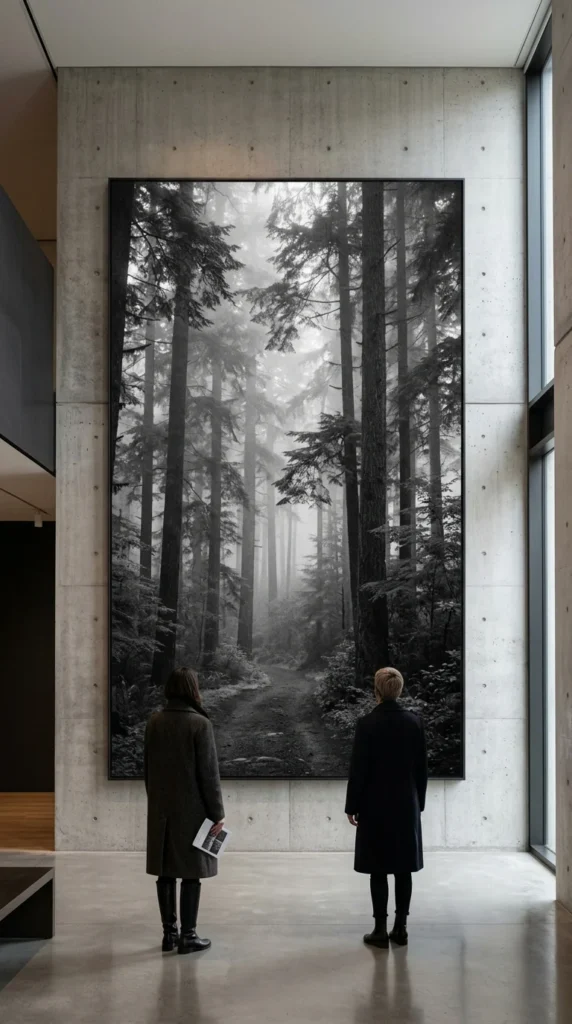
Oversized art is the hallmark of luxury homes, but large-scale frames and prints are usually prohibitively expensive. “Engineer prints” are the secret weapon of the savvy DIY decorator.
- What You’ll Need: A high-resolution digital photograph, an office supply store that offers “Engineer Printing,” and a large DIY frame or a set of wooden hanging rails.
- The Process: Upload your photo to a print service and select the “Engineer Print” or “Architectural Blueprint” option. These are typically printed on thin paper in black and white but cost a fraction of a standard photo print.
- Pro-Tip: Mount the print to a piece of foam core board using spray adhesive before framing. This prevents the thin paper from wrinkling or buckling behind the glass, ensuring a perfectly flat, gallery-style finish.
8. Sunburst Mirror
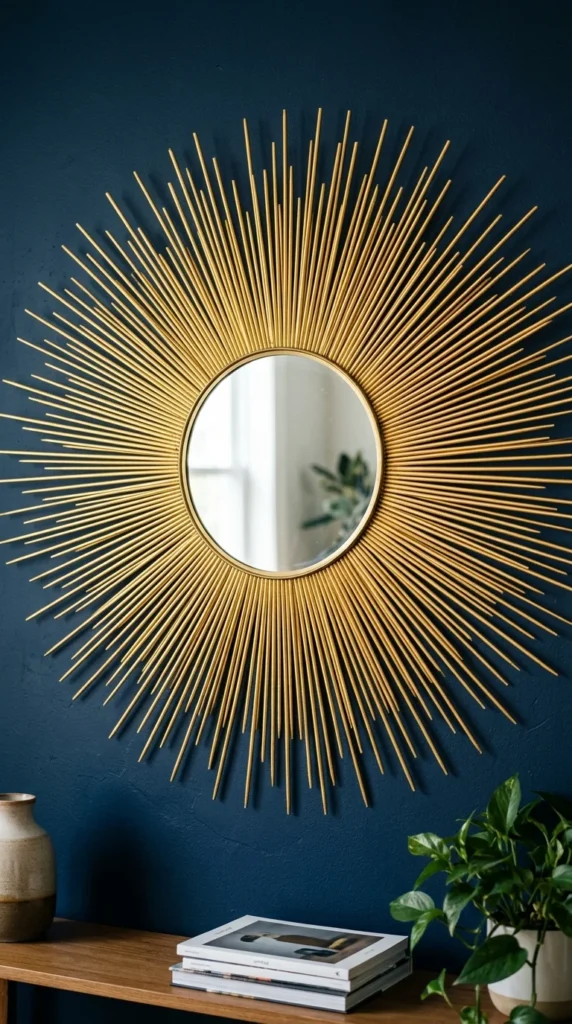
The sunburst mirror is a mid-century modern staple that adds light and a sense of movement to a room. Making one yourself allows you to customize the size and “rays” to fit your specific wall.
- What You’ll Need: A small circular craft mirror, a wooden mounting disk, a hot glue gun, and hundreds of bamboo skewers or thin wooden dowels.
- The Process: Glue the dowels to the back of the wooden disk, alternating lengths to create a “burst” effect. Once the glue is dry, spray paint the entire structure (except the mirror) in a metallic gold or matte black.
- Pro-Tip: Use a “staggered” approach for the rays, gluing some on top of others to create a 3D effect. This prevents the mirror from looking “flat” and gives it the weight and presence of a high-end metal sculpture.
9. Linen Panels
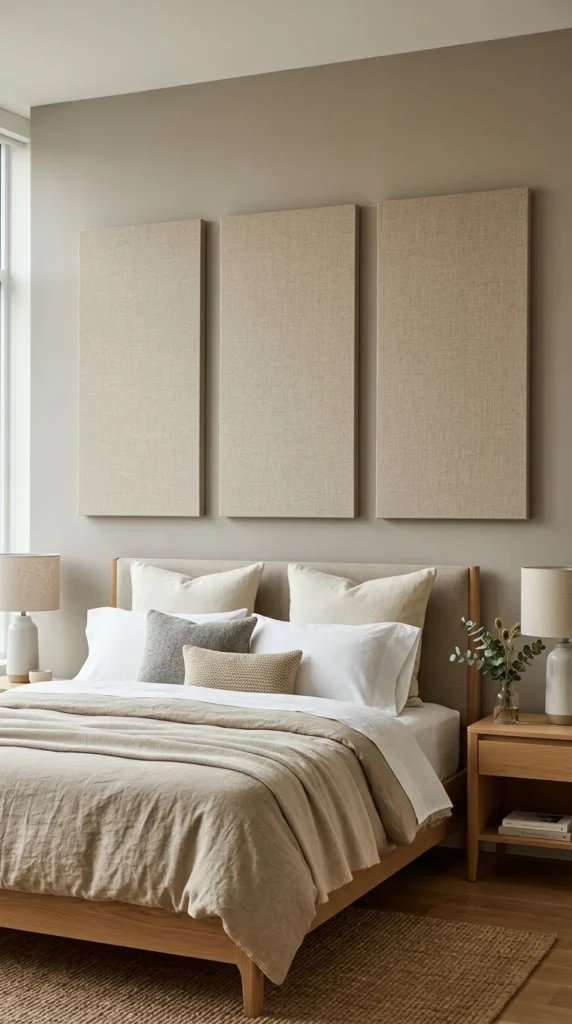
Fabric-wrapped panels are a designer’s secret for adding softness and luxury to a bedroom or office. They look like custom upholstery but are incredibly simple to construct.
- What You’ll Need: Large wooden artist canvases or DIY wooden frames, high-quality linen or velvet fabric, and a heavy-duty staple gun.
- The Process: Lay your fabric face down, place the frame on top, and pull the fabric taut as you staple it to the back. Pay close attention to the corners, folding them neatly like a gift-wrapped box.
- Pro-Tip: If you want a more “plush” look, add a layer of quilt batting over the frame before applying the fabric. This gives the panels a slightly curved, cushioned edge that looks extremely expensive and helps with room acoustics.